Creating a Simple Pipe Lamp

Pipe lamps are a great start to opening up your creativity in lamp making. This simple pipe lamp was my first pipe lamp that really got my creative juices flowing. For this lamp I bought a lamp building kit, 1/2″ black steel pipe (several different sizes), 1/2″ black steal elbows, 1/2′ to 3/4′ adapter, 3/4′ to 1′ adapter, and a Edison style bulb. You can generally buy all these supplies at your local hardware store or if you are like me you just have them laying around your house.

baby_lamp

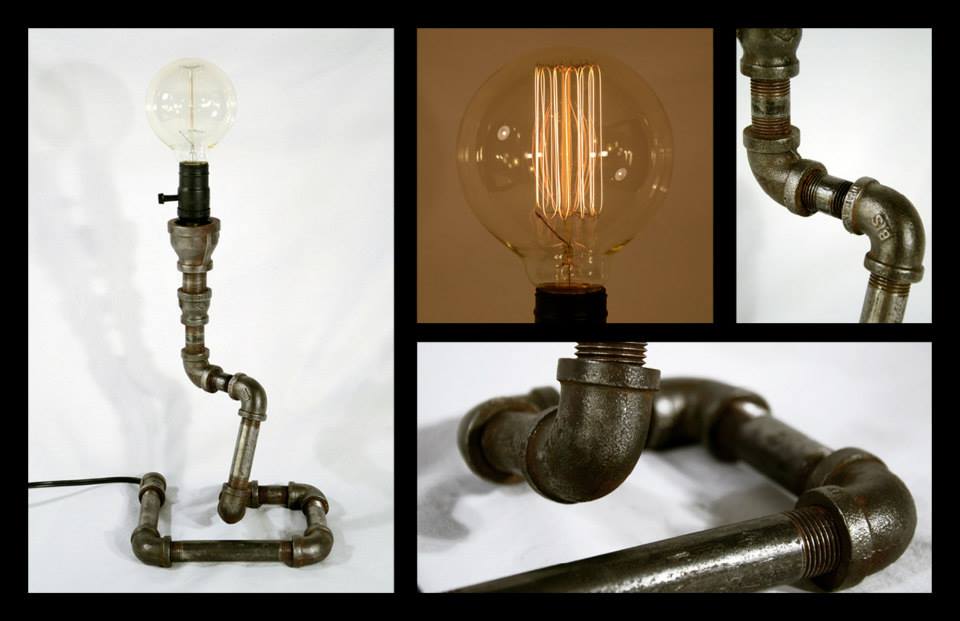
When you buy the pipe it usually comes with oil on it to prevent rusting. This oil can be a disaster and get everywhere so take it off. Once all the crud if off your parts, start mocking up different designs by hand threading the pipes together. This is the hard and time consuming part especially if you are anything like me always wanting something better and different. Once you determine your design, take a picture and take it all apart because its time to build it again!

Building the final pipe lamp can be a little tricky sometimes based on how complex you make your design. Generally I will start building from the bottom connecting pipes and elbows with medium to high strength Loctite or equal and tightening them with two pipe wrenches. After a section is together, fish electrical wire through and repeat. This process will continue until you get to the end where the light socket is. Mounting the light socket base can either be done with epoxy or creating a washer to thread into the 1” pipe adapter. After wiring up your socket based off of your lamp building kit directions you can either color paint your lamp or clear coat paint to lock in the industrial look, as I did. Just make sure you tape off the cord and sockets when painting. Once your paint, epoxy, and Loctite have cured you can install your bulb of choice and have a great conversation piece. Happy Creating!

Creating a CHAIN LAMP

A couple years back while working as a mechanic paying my way through college, I caught the bug… The Creator Bug. If thats a thing. I have always had a knack for making things; mainly things that went boom. Although occasionally I would express my artistic side and here is an example I like to think.

My First Lamp: The Chain Lamp

chain_lamp

Building a chain lamp is fairly easy if you have a welder, welding knowledge, and an idea. I got the cone idea from looking around the shop I was working at and seeing a road cone. Template! I used my sturdy road cone as a template and started welding the links up the cone. Make sure you are welding in a well ventilated location. Road cones melt a little. When I got to the top of the cone I did a little free hand work and let the chain fall down the middle (non welded links) to give it a dynamic effect. Once it was all welded up, I cleaned it good and actually got it powder coated which is something I would not normally do but I was really getting into this lamp and wanted a great finish. Another great alternative would to just get a can of your favorite color spray paint. Once all painted you can go to your local hardware store and get a lamp building kit which generally includes a cord, bulb turn knob socket, and hardware. I ran the cord through the links trying my best to keep the cord on the inside of the lamp all the way to the top. People want to see chain not cord. After the mounting and wiring the knob socket I went to my local thrift shop and found a second hand lamp shade. When selecting a bulb I find that a 40-60 watt bulb is best so the chain on the lamp gets a nice appearance when lite up. O yeah! The chain I used was a 3/8 chain with no coatings on it. Raw steal so when welding you do not produce any harmful fumes. Enjoy your creating! Please leave comments on the type of chain lamps or any lamps you have created.

Blog at WordPress.com.

Up ↑